Monday, April 16, 2018

Custom Shadespire Terrain

Wow it’s now 2018.  I believe my last post was way back in 2012, I am surprised I am still able to access this blog.

So what have I been up to lately?  For the most part, I’ve been busy with work a lot.  Obviously the idea of maintaining a regular blog was soon abandoned.  Now we come to the part why I decided to make a new post.  Mostly just for fun I guess. I also wanted to share a recent hobby project I worked on.

A few months back I bought a game called Shadespire.  It’s a game by Games Workshop that is set in their Warhammer Age of Sigmar universe.  The game is a tactical miniatures game played on a hexagonal grid gameboard.

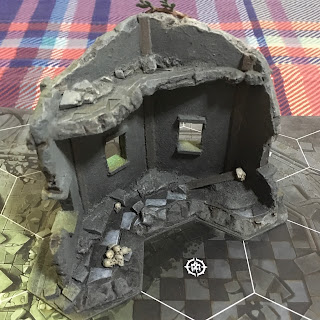
The game had these hexagonal spaces which signified some blocking terrain. Unfortunately the only way to tell if they are such is via a darker shade on the hex and a slighly thicker border line, which in my opinion, could be missed by some players.


That got me thinking, wouldn’t it be better if they had some token or 3D obstacle to show which of these hexes are impassable.  So next thing you know, I made the decision to make some custom terrain myself and here are the finished products.  Till next time...


Friday, August 3, 2012

Lotus F1 Papercraft

I came across this on Facebook recently...

It's another paper craft project for all you guys who love building paper models.  Just follow the link below to download this model of the Lotus E20 F1 car.  All you need is a colored printer and 6 sheets of thick paper.

Enjoy!

https://www.facebook.com/LotusRenaultGP/app_132035906926688


Tuesday, May 1, 2012

Lessons learned from buying knock-offs

What is pictured below is a product called "Faith Leader" by a company called iGear.  iGear is known as one of the more popular companies producing knock-off Transformers action figures.  In fact the "Faith Leader" figure is actually a scaled down version of Hasbro / Takara's Masterpiece Optimus Prime.  This 8.5 inch high action figure is a faithful copy of its original taller counterpart.


There are probably a number of reviews for this product out there on the web.  I'm not really doing a full review here today.  However, I just wanted to share some bad experiences I had with this figure. That's the price you pay for buying knock off products.

First off, I noticed there are that a lot of loose ball joints in this figure.  The figure's head keeps on popping off and additionally the ankle joints are not exactly tight either.  It will take some effort balancing the figure just to make it stand, action poses are more challenging.

Next I'd like to note that the chest panels don't seem to lock in place in robot mode.  It does however close properly in truck mode.

Finally, my worst peeve with this figure is that the plastic used for it seems to be quite brittle.  In fact I've managed to break a panel off its arm already.  Well, this is probably a failure on my part. I was definitely mistaken when I assumed this would be a sturdy action figure.  I wonder if the original Masterpiece Prime owners do encounter the same problems with their arm panels.  I am assuming that Hasbro or Takara would stress test their products before they hit the market.  Unfortunately since I don't own an original Masterpiece Optimus, I can't make any fair comparison on this matter.

Yup, I broke it...
Now for those who are still thinking of picking up this product I would like to share some advice.  When revealing or storing the hands DO NOT use the arm panels as a lever to push or pull the hand component in and out of the forearm.  That is how I ended up breaking my figure.  It's advisable to push in the hand itself to store and try to find some other way to get the hand out without using the arm panels. 


Instructions seemed simple enough... Flip panel up, push hand component in, flip panel down.


In conclusion,  although this product may have been a good replica of the Masterpiece Optimus Prime action figure.  People who consider buying this product should treat it with great care and understand that it is a real fragile item.  Extreme caution may need to be exercised during the transformation process.  This collectible figure is definitely not suitable for younger children.  (Well the box did say 18 and above)

Oh well, since it's already broken and have already lost its collector's value, I'll probably try some DIY repair work on it sometime in the future.  That's all for now, signing off...

Sunday, April 8, 2012

Bburago 1/24 Mini Cooper Monte Carlo Metal Kit Review

Today was I doing some cleaning during the Easter holiday break when I came across one of my old die-cast models collecting dust on the shelf.  The model car shown on the picture below is a 1/24 die cast replica of a Mini Cooper with "Rallye Monte-Carlo" livery.  If my memory serves me right this car was driven by Paul Easter and Timo Makinen in 1994 wherein Mini was celebrating the 30th anniversary of Paddy Hopkirk's Monte Carlo Rally win back in 1964. Don't you think it's a funny coincidence that I should do a review of a car driven by someone named Easter on Easter day... 

This car was given to me by an old college buddy who's really fond of Minis.

The  metal kit featured here today was produced by the Italian company Bburago.  The model is not your typical out of the box collectors die-cast models, this one required some assembly.  Despite of that setback this kit was easy to build, in fact the box states that you only need to be eight years of age to put it together.  That is due to the fact that the parts simply snap into place and no glue is necessary.  It does have a few screws under the chassis so a screwdriver is required.

The body is made of die-cast metal while the rest of the parts are in plastic. Most of the major components came pre-painted.  However, if I recall correctly the decals needed to be applied.  I may be wrong though since it's been ages since I've completed this one.  I did not bother to paint in details on the other parts so what you'll see on the following pictures will be pretty much how the kit will look when assembled straight out of the package.   Now on with my review...


The pre-painted die cast body looks nice and clean.  The color still retained the original quality even after all these years.  The decals also held up pretty well. I don't see any discoloration on any of them.  I am not much of a fan of the wheels though, I do not like how the axle peg looks out of place on the tire rims.  I also wished they had some clear parts for the lamp below the rear bumper instead of just plain chrome. 


The chassis on this kit looks very much like a toy, with the manufacturers labels engraved on it. There are however, a few nice details for the front and read suspension but I feel there is nothing much to look at here.  That's the reason why I normally keep this car mounted to the display base which came with the kit.

Like in most die-cast models, the doors and bonnet are operable which leads me into the next part of my review.  I have to apologize for the untidy interiors, I didn't have the chance to thoroughly clean up the kit before taking the pictures.


Generally, I think this kit's weakness is the interiors.  Most of what is inside are just molded in black plastic.  However to be fair, I think the kit does have a lot of potential for detailing.  I'm sure the engine and dashboard will pop out when the details are painted in.

In conclusion, if I were to rate this kit from 1 to 5 with five being the highest I'd probably give it a 3-1/2.  The pre-painted hull and ease of assembly is great for Mini Cooper lovers young and old.  That's all for now... Happy Easter everyone!

Friday, March 30, 2012

Love Motorcycles?

Here is an interesting site for motorcycle lovers, paper craft enthusiast and scale modelers out there.


Yamaha has this webpage where you could download several paper model kits of selected motorcycles they've produced for free.  All you need are some card stock, a craft knife, lots of glue and a printer.  Just follow the instructions provided and viola you'll have a paper replica model of an actual Yamaha bike.

The webpage also includes some non-cycle related models for the paper craft lovers. One will definitely find lots of interesting things to do here. I'll probably give one of these motorcycle kits a try in the future.  But first, I'll need to stock the necessary supplies and find some time off from my busy work schedule.

Sunday, February 26, 2012

MS-06S Zaku II - Char Aznable Custom Mobile Suit Gallery

After building my Gundam RX-78-2 last month, I had the urge to assemble another kit from the Mobile Suit Gundam series.  This time I wanted to put together a model kit representing a mecha from Principality of Zeon, the opposing forces in the original Gundam series.  

In the anime, the forces of Zeon churned out a variety of mobile suits to oppose the Gundam.  I wanted to pick one that I remembered very well from my childhood, namely the Zaku. The Zakus which appeared early on in the series were not the best mobile suits in Principality's arsenal, in fact they ended up mostly as fodder for the Gundam. This particular robot design however it is probably the most recognized by fans of the series.

But the choice wasn't that simple... As depicted in the series, the MS-06 Zaku II units were mass produced and many variants of this mecha were made.  Of course Bandai, the company who makes Gundam scale models, also made several kits representing each of these variants. 

So from all of the kits that were available in the market I settled for the MS-06S Char Aznable custom version.  Char, who was also known as the Red Comet, piloted a custom painted Zaku II donning his signature colors.  He was one of the main antagonist in the original anime series, however he also became a protagonist in the later sequels.  

Here are some pics of my finished model...

Such a big box for a tiny figure...
Char Aznable boarding his custom MS-06S
Zaku II with the Bazooka at ready.
Engaging the opponents with the Heat Hawk.
Sniping targets with the machine gun.

Monday, January 23, 2012

Gundam RX-78-2 Gallery

I recently finished building my RX-78-2 kit.  I really enjoyed putting this one together.  Despite the fact that most Gundam kits could be assembled without the need of paint, I did opt to do some basic painting on this one to highlight some of the model's details. 

Being extremely articulated there are so many poses possible with the typical Gundam kit.  Taking pictures of the model was so much fun.  Here are some photos I took of the finished product. 

The RX-78-2 with the FF-X7 Core Fighter
Painting those 15mm high figures of Amuro was a real pain.


Wielding a Beam Saber
Armed with the Hyper Bazooka
RX-78-2 carrying a Beam Rifle with Super Napalm attachment
Taking a swing with the Gundam Hammer
Beam Javelin at ready...
I must confess, I think I've been bitten with the Gundam bug.  I now have an urge to build another one soon.  Perhaps I'll purchase an opponent for my RX-78-2, then I'll be able to set up some battle poses in the near future.