Showing posts with label scale model. Show all posts

Sunday, April 8, 2012

Bburago 1/24 Mini Cooper Monte Carlo Metal Kit Review

Today was I doing some cleaning during the Easter holiday break when I came across one of my old die-cast models collecting dust on the shelf.  The model car shown on the picture below is a 1/24 die cast replica of a Mini Cooper with "Rallye Monte-Carlo" livery.  If my memory serves me right this car was driven by Paul Easter and Timo Makinen in 1994 wherein Mini was celebrating the 30th anniversary of Paddy Hopkirk's Monte Carlo Rally win back in 1964. Don't you think it's a funny coincidence that I should do a review of a car driven by someone named Easter on Easter day... 

This car was given to me by an old college buddy who's really fond of Minis.

The  metal kit featured here today was produced by the Italian company Bburago.  The model is not your typical out of the box collectors die-cast models, this one required some assembly.  Despite of that setback this kit was easy to build, in fact the box states that you only need to be eight years of age to put it together.  That is due to the fact that the parts simply snap into place and no glue is necessary.  It does have a few screws under the chassis so a screwdriver is required.

The body is made of die-cast metal while the rest of the parts are in plastic. Most of the major components came pre-painted.  However, if I recall correctly the decals needed to be applied.  I may be wrong though since it's been ages since I've completed this one.  I did not bother to paint in details on the other parts so what you'll see on the following pictures will be pretty much how the kit will look when assembled straight out of the package.   Now on with my review...


The pre-painted die cast body looks nice and clean.  The color still retained the original quality even after all these years.  The decals also held up pretty well. I don't see any discoloration on any of them.  I am not much of a fan of the wheels though, I do not like how the axle peg looks out of place on the tire rims.  I also wished they had some clear parts for the lamp below the rear bumper instead of just plain chrome. 


The chassis on this kit looks very much like a toy, with the manufacturers labels engraved on it. There are however, a few nice details for the front and read suspension but I feel there is nothing much to look at here.  That's the reason why I normally keep this car mounted to the display base which came with the kit.

Like in most die-cast models, the doors and bonnet are operable which leads me into the next part of my review.  I have to apologize for the untidy interiors, I didn't have the chance to thoroughly clean up the kit before taking the pictures.


Generally, I think this kit's weakness is the interiors.  Most of what is inside are just molded in black plastic.  However to be fair, I think the kit does have a lot of potential for detailing.  I'm sure the engine and dashboard will pop out when the details are painted in.

In conclusion, if I were to rate this kit from 1 to 5 with five being the highest I'd probably give it a 3-1/2.  The pre-painted hull and ease of assembly is great for Mini Cooper lovers young and old.  That's all for now... Happy Easter everyone!

Tuesday, November 1, 2011

Aston Martin DBS Build Journal Volume 7: Conclusion

I’ve been quite busy lately and was not able to post any updates on my Aston Martin DBS project.  I did however manage to sneak a few hours of modeling every now and then, but was too tired to post anything on my blog.  I finally found some free time to go online today and do a wrap up for this project.

A few weeks back I started work on the exterior of this scale model.  The first thing I had to do was to inspect the body for areas that needed some preparation before the paint job.  The Tamiya body was quite clean; however, I did find some excess casting lines that needed to be sanded down.  After that task was done, I went ahead and primed the body for painting.

This needed some sanding down...
Trying to keep the work protected from dust in between coats...

The following week I stated painting the body.  The instructions called for the use metallic black to simulate “Quantum Silver” from the DBS used in the James Bond movie Quantum of Solace.  I didn’t really want a black car and wanted more of a greyish color, so I opted to use Tamiya TS-42 Light Gun Metal instead.  While waiting for the paint to dry I went ahead and applied some carbon fiber decals to the side mirrors and front bumper trims.


Once everything was done, all that was left was to give it a coat of clear gloss and finish the assembly.  Here are some pictures of the finished product.

The V12 engine under the hood.
Front profile.
Rear view.


For the last photograph, I wanted to play around a bit... So I staged a scene using a picture from one of my architecture books as the background, my newly assembled kit and a collectible 3" James Bond figurine by Corgi that was released back in 2001.  It is quite unfortunate that they didn't get to produce a Daniel Craig - Bond figurine to add to this collectible line after the iconic role was passed to the new actor.  It would have been a better match for this DBS miniature.

Oh yeah before I forget, I’ve also added a simple “rating” feature at the bottom of my posts, feel free to use it to rate my work.

Sunday, September 25, 2011

Aston Martin DBS Build Journal Volume 5: Interior (WIP)

Having completed the chassis the previous week, I went ahead and started work on the car interiors this weekend.   First off was to spray the individual parts in “German Grey”.   While waiting for the paint to dry, I used the time to review some reference images of the DBS interior.

For this build I decided to have some fun and do some simple carpeting.  Usually an interior carpet effect is done by using really fine flocking powder.  Unfortunately I didn’t have any on hand; so I decided to use something easier to get a hold of, namely some felt paper.  Felt paper, in my opinion, is much easier to handle.  Gluing flocking material can get really messy and I wouldn’t want to accidentally apply the material in areas I didn’t need to cover with carpet.

Using some tape to trace a template for my carpet.

Here is the template used as my cutting guide.

The felt paper was cut slightly larger than my template.

Doing a final test fit.  Scoring the paper in preparation for the final trim.
 
The kit also came with a sheet of photo-etched parts.  These tiny metal parts add another level of detail to the finish product.  I had to attach a couple of these at the rear of the interior.


Things went well this weekend.   Hope my luck persists for the rest of the build.  Here is a picture of what I managed to finish.


Halfway there... Up next, the seats and dashboard.

Sunday, September 11, 2011

Aston Martin DBS Build Journal Volume 3: Uneventful Week

Started work on the chassis and rear suspension this weekend.  The task went along smoothly with no major incidents.  I'm not a hundred percent content with the results of my paint job.  I guess I'll still need more practice to get my painting skill improved.  Well, that's it for tonight, see you guys again soon...


All the effort exerted, only to be covered up...


Sunday, September 4, 2011

Aston Martin DBS Build Journal Volume 2: Murphy's Law

We were fortunate to have an easy week at work.  Our team managed to finish all our tasks before the close of business last Friday afternoon allowing us to have a worry free weekend.  I used my free time to work on my DBS kit once again.  

I started the weekend working on the brake discs.  Painted each part individually, glued them together and applied the decals as per the instructions.  This task went fairly well.

Weird, this picture made the brake discs look like they were made of stone...
I moved on to assemble the engine and front suspension next.  Once again, I painted each part prior to assembly.  I find it much easier doing this since I need not worry smearing paint on adjacent parts unnecessarily.  


This kit came with a sheet of metal transfer for the lettering on the engine.  I’ve only worked with wet decals before and it’s the first time I’ve worked with these dry transfer sheets.  Just a brief explanation on the difference between decals and transfers for those who couldn't follow:

First wet decals, you will need to dip these in water for around 10 seconds, by then they could be slid from their backing sheets and positioned into place on the model.  You will need to dab the decal with a soft cloth or paper towel to remove the excess water and air bubbles.  It should set once everything is dry.

The dry transfers on the other hand, will require you to position the sheet on the location where you want the transfer to be placed.  You will then proceed to gently rub on the transparent film that is holding the transfers.  Once the metal transfer sticks to the model part, you will need to gently peel off the film.

I’ve read several anecdotes on the internet wherein some of the transfers fail to cling to the model.  It was quite disheartening to learn about this, especially for a first-timer.  I did manage to execute my task successfully and I did learn a few things about these transfers in the process.  Peeling the transparent film takes a lot of patience; I did mine one letter at a time.  Whenever I notice the transfer fail adhere to the model part, I would reset the backing film and rub on it again.

After all the decals and transfers were applied, the only thing left was to assemble the engine and suspension. Should be pretty straight forward...

"If anything can go wrong, it will..." – Murphy’s Law


Had another mishap in the process, I might have accidentally touched one of the break caliper decals while assembling the kit. The decal probably did not set properly and was sheared off when I unconsciously made contact with it.  This is my second decal incident encountered for this build.

I guess I have to call it quits for now and continue working on this car some other time.  I'll need to think on ways to salvage this project.  Until then...

Here is what was successfully completed this weekend...

Sunday, July 17, 2011

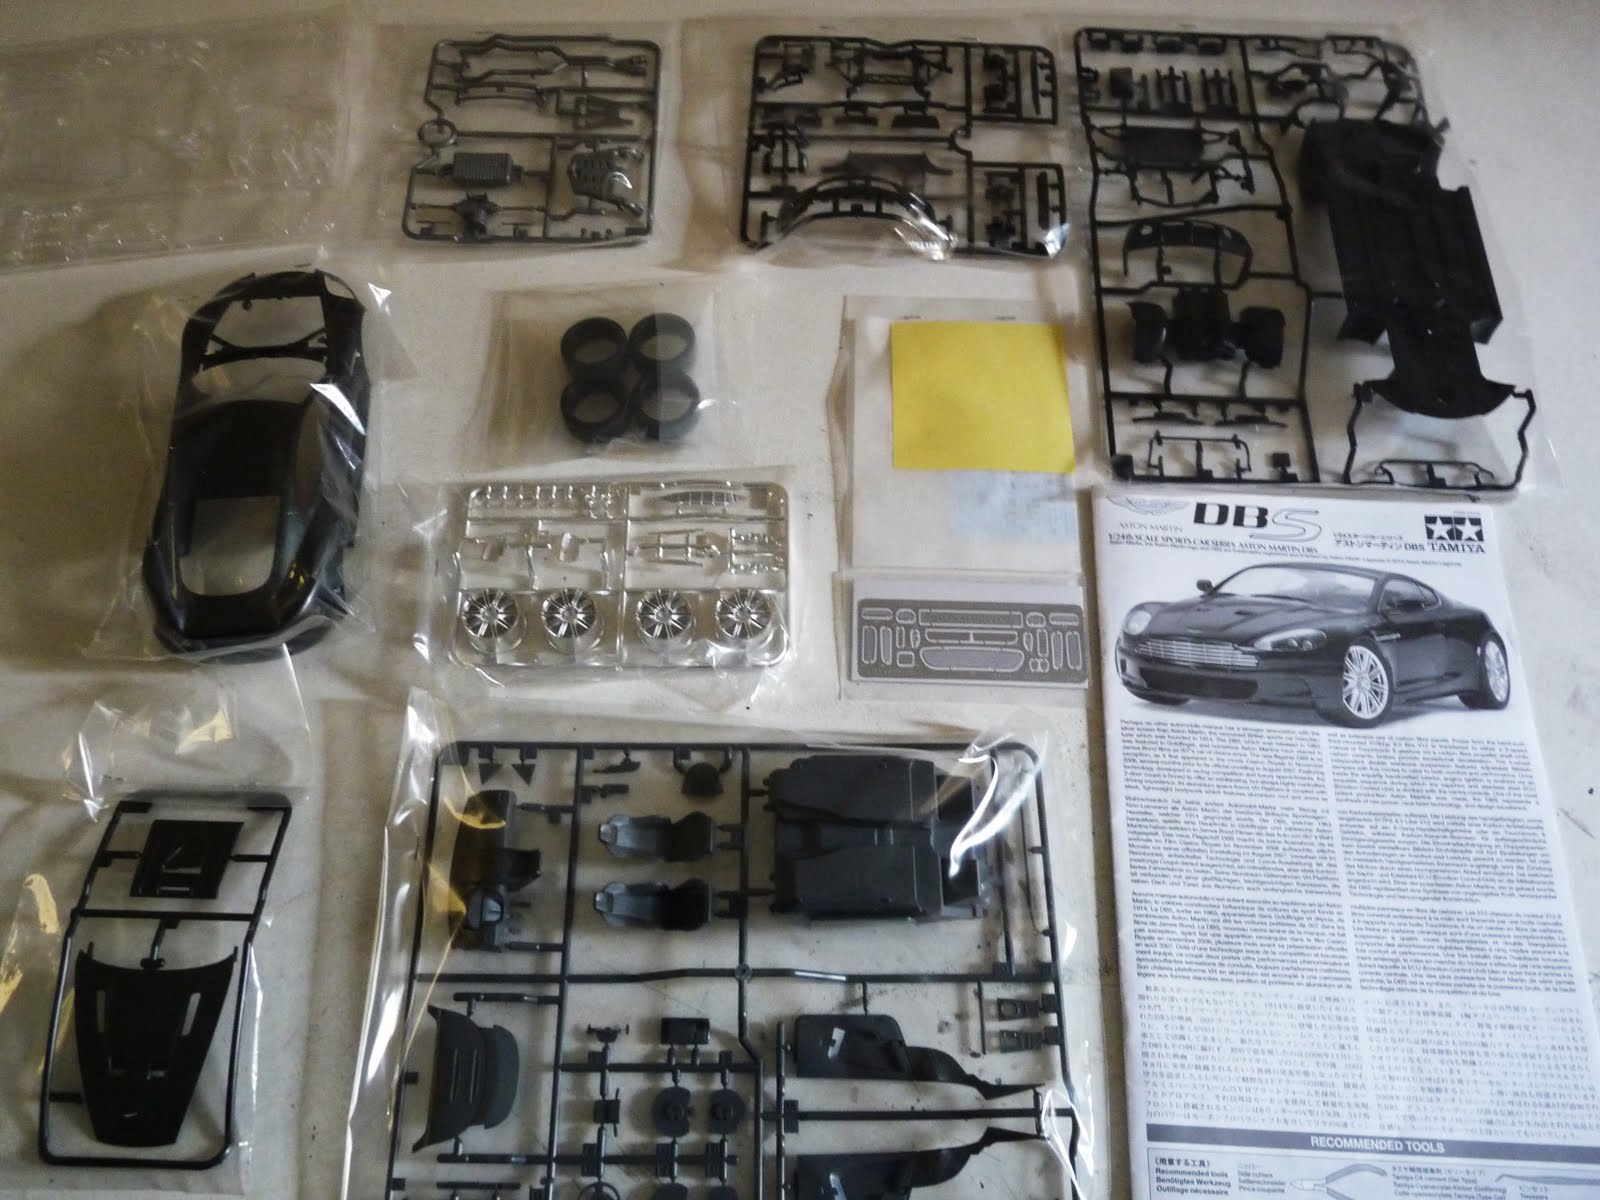
Tamiya Aston Martin DBS

I took a trip down to the nearest hobby shop today to get some canned paint for my Bluestreak restoration project.  

It's been a while since I got the chance to visit this store, mainly because I was away for several years and I haven't been modeling for some time now.  After browsing through the store's shelves I ended up purchasing a Tamiya 1/24 scale Aston Martin DBS car kit along with the paint I intended to buy. 

This car was featured in a couple of James Bond movies, “Casino Royale (2006)” and “Quantum of Solace (2008)".

Since I still have an ongoing project at the moment I'll be placing this one in storage for now.